
During my last couple of 121s with Wendy we have discussed the importance of a strong installation within a gallery space. ‘That the space of the room becomes of such importance does not mean that an environmental situation is being established’ wrote Morris though in contradiction indicated that the space would be some how altered as a result of the installation (Bishop, 2012). 5th Base Gallery is a long thin gallery and its overall proportions have similarities to the landing stages that feature in my work. The end wall is a key focal point within the space with the side walls drawing the visitor toward that point.
When I have been part of group exhibitions I have constructed my installation diagrams in digital form as images are intended to hang on part of a wall. This will be a solo exhibition and therefore considering the total space becomes more important to help guide the visitor with position of images influencing the way the reader views subsequent images.
To help me visualise the space more effectively I decided to build a physical model of the space providing the opportunity to attach different images to the walls of my model. The scale model affords me the option of placing people into the space to get a sense of how the work will relate to people.
After speaking to Philip Singleton on the typical scale models used by architects I decided to build a 1:25 scale model of the space. I managed to source from Amazon some 1:25 figures(Amazon.co.uk, 2018) that could be placed in my gallery.
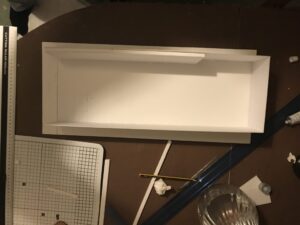
Using the floor plan from 5th Base Gallery I started to determine the scale dimensions of each wall for the model. I decided to use form board as the base of the model and thick card to make the walls. The first step was to transfer the floor plan to the foam board. The cut each of the walls.
Construction took place on the dining room table as the desk in the office is fully utilised with tools of operating a digital darkroom.
Having installed the back and side walls the next task was installation of the entrance door and the internal walls. Having completed that step I placed a number of my scale people into the space.
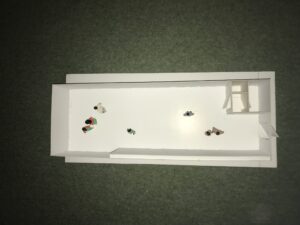
The aerial view was useful though probably not the best way to see how the work would interact with the people so my next step was to place my iPhone into the space itself and record images.
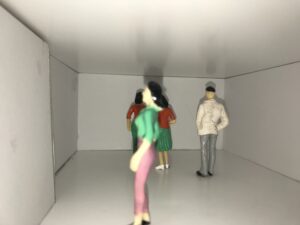

The model is currently a traditional white cube the next step will be to create scale layouts to attach to the walls and examine how the space works will images hanging on the walls.
Overall I am happy with the model though further attention to details could have helped improve the overall visual look of the model. Having learnt from this initial model I decide if it is necessary later in the module to make a more refined version of the gallery.
In addition to my physical model I will explore use of a digital version using software from Belight called Live Home 3D (Belight, 2018). The software will provide me with the options to create an online VR version of the exhibition and its contents ahead of the exhibition.
References
- Amazon.co.uk. (2018). [online] Available at: https://www.amazon.co.uk/20pcs-Painted-Passenger-People-Figures/dp/B008604WZK/ref=sr_1_3?ie=UTF8&qid=1522593316&sr=8-3&keywords=1+25+scale+model+figures [Accessed 30 Mar. 2018].
- Belight, (2018). Live Home 3D — Home and Interior Design Software for Windows and Mac. [online] Livehome3d.com. Available at: https://www.livehome3d.com/mac/live-home-3d [Accessed 30 Mar. 2018].
- Bishop, C. (2012). Installation Art. 3rd ed. London: Tate Publishing, p. 55.